
How to Fix Misaligned or Unreadable Koha Labels
Diagnose Koha label problems in order: PDF geometry, scaling, offsets, sheet creep, clipped bars, skipped labels, and scanner output.
Inspect the exported PDF before changing the printer profile. A clipped PDF cannot be repaired by shifting the paper, and a wrong-size print should not be corrected with a Koha offset.
Software verified: Koha 25.11.04, 2026-11-12, with synthetic demo items. Physical printer and scanner: not tested. The example below is a known software baseline, not a proven fix for every device.
1. Record the failure
Keep the original PDF and note the Koha version, template, layout, profile, stock number, driver, PDF reader, and print settings. Measure the error at the first and last labels. Change one setting at a time and export a fresh PDF after each Koha change.
| Symptom | Start here |
|---|---|
| Content is already missing in the PDF | Template dimensions, text margins, layout scaling |
| Everything prints smaller or larger | Actual-size setting, driver media size, page-per-sheet setting |
| Every label shifts equally | Page geometry, then printer-profile offsets |
| Error increases along a row or down a sheet | Label pitch and gaps, then creep |
| Roll advances blank labels or skips | Stock compatibility, loading, boundary detection, driver size |
| Bars look intact but scanning fails | Encoding, quiet zones, print quality, exact decoded value |
| Quick spine formatting ignores the PDF layout | Quick-label preferences, CSS, browser print setup |
2. Establish a PDF baseline
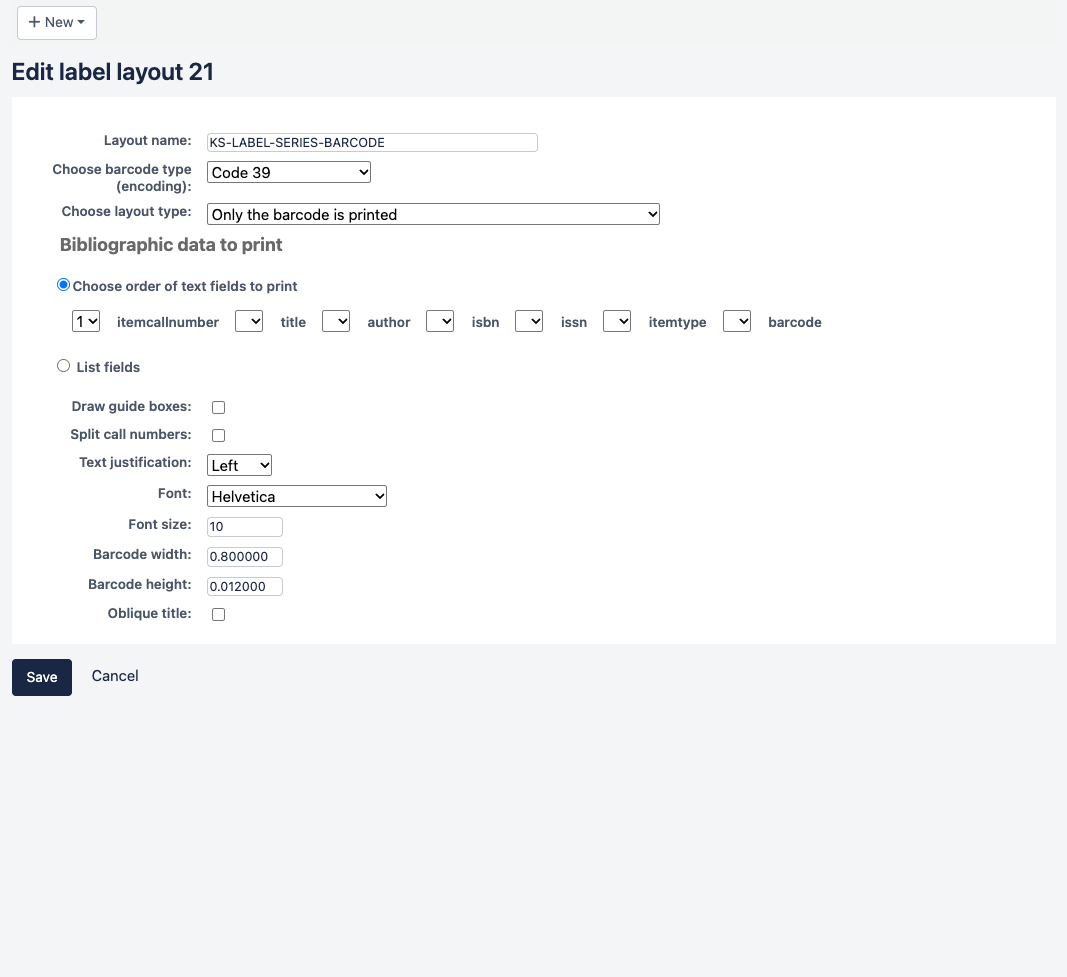
Our three-page barcode sample uses:
| Setting | Tested value |
|---|---|
| Units | Inches |
| Page and label width / height | 2 / 1 |
| Columns / rows | 1 / 1 |
| Top / left page margins; column / row gaps | All 0 |
| Top / left text margin | 0.25 / 0.10 |
| Profile | No Profile |
| Encoding / printing type | Code 39 / Only the barcode is printed |
| Barcode width / height | 0.80 / 0.012 |
| Font / size / justification | Helvetica / 10 / Left |
| List fields | itemcallnumber (unused in barcode-only mode) |
| Split call numbers / guide boxes / oblique title | Off / Off / Off |
The PDF contains KSDEMO0001 through KSDEMO0003, each on a 2 × 1 inch page. All three decoded exactly at 300 and 600 dpi. Compare your PDF’s dimensions and visible content with the intended stock; do not use demonstration identifiers on real books.
3. Eliminate scaling before offsets
Select the matching driver paper size, 100% / Actual size, and one PDF page per physical page. Disable Fit, Shrink, and multiple-pages-per-sheet. Check orientation in the preview.
Print a plain-paper test where possible and measure a known distance. If the printed distance is wrong, correct scaling or media selection first. An offset moves content; it does not restore its size.
4. Distinguish a fixed shift from creep
For an equal shift everywhere, first check the template’s page margins and printable area. Then create a dedicated Printer profile for that printer, tray, and stock. Record the measured horizontal and vertical displacement in explicit units; apply one offset, export, and compare. Verify the direction with a small test rather than assuming the sign.
For increasing error, check the physical label pitch: label width plus column gap, or label height plus row gap. On the tested Avery sheet, horizontal pitch is 2.75 inches and vertical pitch is 1 inch.
Only investigate profile creep after geometry and scale are correct. Leave creep at zero for a one-label-per-page template. No numeric printer offset or creep correction is recommended here because no physical displacement was measured.
5. Check clipping and crowded text
Look at the first and last bars, quiet space on both sides, readable value, and longest identifier. A layout that fits a short value may crowd a longer one.
During the text-layout test, a 0.10 inch top text margin placed the large first line against the PDF edge. Increasing it to 0.25 inch gave the tested Helvetica 10- and 12-point examples visible clearance. This is a software geometry correction, not printer calibration.
Barcode height is an exporter scaling parameter, not simply a percentage of the label. Use the tested height only with its stated label size. If there is not enough room for both text and bars, use a larger label or separate spine and barcode labels.
6. Diagnose skipped labels outside Koha
Use the printer’s feed or self-test procedure without Koha. Confirm compatible media, loading direction, sensor/index alignment, and the exact driver size. If it skips during the manufacturer’s test, address that before changing the PDF. Follow the manufacturer’s cleaning instructions rather than experimenting with solvents or feed mechanisms.
7. Check what the scanner actually sends
Scan a physical label into a plain text field. Compare the whole value with Koha, including leading zeros and letters. Check configured prefixes, suffixes, and barcode symbology support. A visible number is not proof that the bars encode the same number.
If a value is truncated or changes, investigate scanner configuration before editing item records. If nothing decodes, check quiet zones, clipped or broken bars, density, stock, and printer quality. Finally, search Koha with the scanned value and confirm the correct copy.
Stop collection-wide printing until a small batch passes both visual inspection and scanning. Software raster decoding does not prove a physical scanner will work.
Sources: Koha 25.11 Label creator and printer profiles. Full series, sample exports, and verification limits.
Next Steps
More in Koha System
Was this article helpful?